|
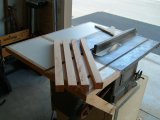
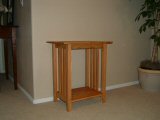
Perhaps your first question is why try to make a pallet into anything? It is a perfectly good pallet after all! Well I suppose there are several reasons. As a beginning woodworker I wanted to hone my skills on a "disposable" project. The pallets seemed like a inexpensive way to practice the craft. I also appreciate the recycling aspect of the project. It warms my heart to know that the pallets I transform to projects don't end up in landfills. I try not to think about the fact that the projects I create from pallets will probably end up in landfills. I also have a steady supply of pallets from my job. I work in a I.S. department that sees a steady stream of equipment shipped on pallets. If you would like to build your own table you can find measurements here. Basic assembly instructions are here. This is a very simple project to make, and quite a bit of fun. I have made several tables already and I gave them away to friends. |
 Click picture for larger image |
|
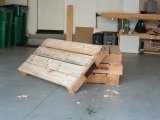
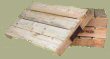
Yes the pallets were
free, but it is hard work to be cheap. These pallets were built with
"spiral" nails. It is very difficult to remove that type of nail, so I
simply cut of the planks as close as possible to the 4x4's. Once this
is done I attack the 4x4's with a crowbar. I break off the remainder of
the pine boards and then pry out the nails. This pack of pallets had
eight redwood 4x4's. I was only able to salvage five of them. In some
instances the heads of the nails broke. Once that happened I tossed the
4x4 in the garbage. There are limits to my frugality!
|
 Click picture for larger image |
|
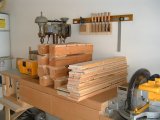
I do not own a jointer, so I used what I have, a hand plane. This was also part of the whole exercise, a chance to get some hand tool experience. I learned an incredible amount about tuning the tool by the end of the day. I also put a substantial amount of sweat equity into the project. |
 Click picture for larger image |
|
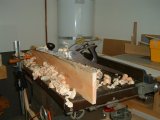
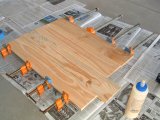
In
no way shape or form are the boards I
planed consistent in thickness. Each board has its own high and low
spots. The variances in the stock caused me to use special
considerations during the glue up process. I spent quite a bit of
time selecting the boards for the table top. Once I found the boards
that fit and looked best I glued them up with the good side down. I
concentrated on getting the "good" side as flat as possible during the
glue up. The part of the table top that does not show had several
"ridges" at the glue line. That really did not bother me because you
will never see them once the table is assembled. I also glued up the
lower shelf. It is not pictured, but I applied the same rules.
|
 Click picture for larger image |
|
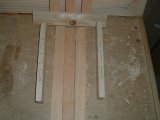
I cut all four legs from a single 4 x 4. The pallets had a couple 4x4's each. The dimensions were almost perfect, but I would have preferred that they were half an inch longer. I cut the 4/4 into quarters and then I trimmed each leg to 1 1/2" square. This seemed a little "thick" to me so cut them down to 1 1/4 square. I used the material that I trimmed off as the side rails. I cut the skirt and side rails next, there cuts are pretty straight forward, I simply choose stock based on looks. |
 Click picture for larger image |
|
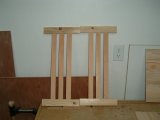
Here is a closeup of the
mortises that I put in sides. This is the only area where a mechanical
joint would really stand out. I bored the holes out with a forstner bit
on the drill press and cleaned it up with a chisel. The side rails that
I described above are what go in the mortises.
|
 Click picture for larger image |
|
Here is a closeup of the side assemblies. There is no tenon to speak of I just slipped the 1/4" stock into the mortise I cut. If my stock had been thicker I would have cut tenons. |
 Click picture for larger image |
|
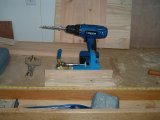
One of my stated objectives for
this project was to get a little more experience with hand tools. Well
I was not totally averse to some modern technology. I used a pocket
hole jig for a the skirt assemblies. Once I had glued up
the panels and assembled the sides the whole table went together in
about fifteen minutes. I have not pictured it, but I used
figure eight hardware to attach the top.
|
 Click picture for larger
image
|
|
Here is a look at the table with a single coat of Briwax. I choose Briwax because it is easy to apply and it seemed to be a good fit for the "rustic" look I was trying to achieve. Right after I took this picture I gave the table away to a friend that needed a bedside table. When you enlarge the photo you will have a chance to scroll around to see the final assembly. |
 Click picture for larger
image
|