Introduction
 Several
years ago I made my router table, based on a New Yankee design I was
thrilled with its size and stability, and cost. I made the entire table
from scraps, including the base plate. What I did not have at the time
was a fence. I wanted a fence that had many of the qualities of my
table, solid, easy to build, and cheap. A friend of mine lent me a American
Woodworker magazine, it had a fence that fit the bill. Here are my
notes on building that fence.
Several
years ago I made my router table, based on a New Yankee design I was
thrilled with its size and stability, and cost. I made the entire table
from scraps, including the base plate. What I did not have at the time
was a fence. I wanted a fence that had many of the qualities of my
table, solid, easy to build, and cheap. A friend of mine lent me a American
Woodworker magazine, it had a fence that fit the bill. Here are my
notes on building that fence.
Materials
A half sheet of MDF for
- Base 3/4" x 3-1/2" x 36"
- Face 3/4" x 4" x 36"
- 2 Sliding Faces 3/4" x 4"x 18"
- 4 Corner Blocks 3/4" x 2-3/4" x 2-3/4"
4 Carriage Bolts 1/4" x 2"
4 Fender Washers 1/4"
4 Wing Nuts 1/4"
1 1/4" x 3-1/4" x 3-1/4" piece of Polycarbonate (optional)
Assembly
First cut out the materials listed above, with one special consideration. For the base and the face cut out a 7 1/2" + kerf x 36" piece of MDF. Prior to cutting this piece in two use a hole saw to cut a 4" hole centered between the cut line. See the diagram on the right. Once you have cut out the hole rip the piece in
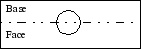 two. If you properly allowed
for the kerf the base should be 3 1/2" and the face should be 4".
two. If you properly allowed
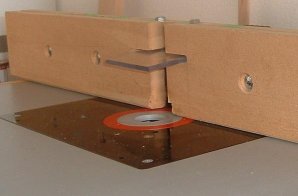
for the kerf the base should be 3 1/2" and the face should be 4". Next cut 4 slots on the face. Each slot is 3" long. They should be centered on either side of the center hole. I used a 1/4" router bit to make the cuts. Clamp a board to your router table for a temporary fence, and plunge cut the slots. The outside slot starts 2" in from the edge, the inside slot starts 12" in from the edge. An optional slot for a blade guard is 3 -1/2" wide just above the hole cut in the center. This slot would house the blade guard. Reference photos here for clarification. On each of the sliding faces counter sink 2 carriage bolt on each face. The carriage bolts should be centered top to bottom to match the slots above and set in 4" from the outside on both sides. On the inside of these faces cut a 1/4" slot centered top to bottom that goes in 2". This allows the faces to close together if a guard is installed. Again see the photo for reference.
The next step is to attach the base and the face together. Stand the face up on end and then attach it to the base. Use drywall screws that go through the face into the base. It is extremely important that this joint is a perfect 45 degrees. Once this is complete attach 2 o f the corner blocks (triangles) on the out side of the hole you drilled. Once installed install the 2 remaining blocks on the fence, try centering them from the outside to an existing corner block. Again reference the photos if you have questions. Once the fence face and base are joined simply attach the faces to the fence with the carriage bolts washers and nuts. If you would like to make a guard drill holes from the top of the face down to the slot in the center. Slip a piece of polycarbonate in the center slot. Slip a marking device down the 2 holes drilled from the top of the fence to mark the polycarbonate. Drill 1/4" holes in the polycarbonate. Now you should be able to slip the polycarbonate in the center slot and secure it by dropping the 2 hex bolts in from the top of the fence.
This description make very little sense to me but I am counting on you to put all the pieces together by reading my inadequate descriptions and referencing the photos. This should be enough to assemble the fence. Once assembled slide the outside faces in and out to keep a tight clearance on the bit. Oh I left out one part. Take a piece of hardboard and attach it to the 2 center corner blocks and drill a hole to accommodate your dust collection. Seal it up tight with glue and you are ready to role.